Create a Site-to-Site connection
This post shows you how to use the Azure portal to create a Site-to-Site VPN gateway connection from your on-premises network to the VNet
A Site-to-Site VPN gateway connection is used to connect your on-premises network to an Azure virtual network over an IPsec/IKE (IKEv1 or IKEv2) VPN tunnel. This type of connection requires a VPN device located on-premises that has an externally facing public IP address assigned to it
Prerequisites
Configuration
1- Sign in to the Azure portal
2- Create VNET
3- Create the VPN gateway
A Site-to-Site VPN gateway connection is used to connect your on-premises network to an Azure virtual network over an IPsec/IKE (IKEv1 or IKEv2) VPN tunnel. This type of connection requires a VPN device located on-premises that has an externally facing public IP address assigned to it
Prerequisites
- Make sure you have a compatible VPN device and someone who is able to configure it. see About VPN Devices.
- Verify that you have an externally facing public IPv4 address for your VPN device.
- None of the subnets of your on-premises network can over lap with the virtual network subnets that you want to connect to
Configuration
1- Sign in to the Azure portal
2- Create VNET
3- Create the VPN gateway

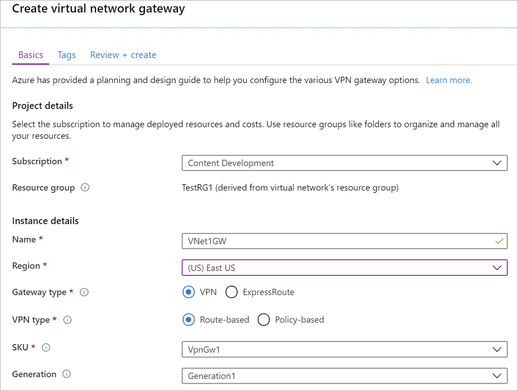
ateway type: Select VPN. VPN gateways use the virtual network gateway type VPN
VPN type: Select the VPN type that is specified for your configuration. Most configurations require a Route-based VPN type
SKU: Select the gateway SKU from the dropdown. The SKUs listed in the dropdown depend on the VPN type you select., see Gateway SKUs.
Generation: For information about VPN Gateway Generation, see Gateway SKUs.
5- Create the local network gateway
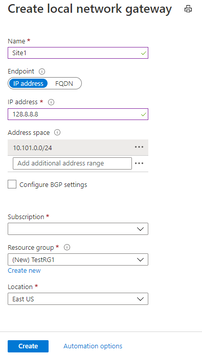
IP address: If you have a static public IP address allocated from your Internet service provider for your VPN device, select the IP address option and fill in the IP address as shown in the example. This is the public IP address of the VPN device that you want Azure VPN gateway to connect to. If you don't have the IP address right now, you can use the values shown in the example, but you'll need to go back and replace your placeholder IP address with the public IP address of your VPN device. Otherwise, Azure will not be able to connect.
FQDN: If you have a dynamic public IP address that could change after certain period of time, usually determined by your Internet service provider, you can use a constant DNS name with a Dynamic DNS service to point to your current public IP address of your VPN device. Your Azure VPN gateway will resolve the FQDN to determine the public IP address to connect
Configure BGP settings: Use only when configuring BGP. Otherwise, don't select this
6- Configure your VPN device
When configuring your VPN device, you need the following:
8- Create the VPN connection
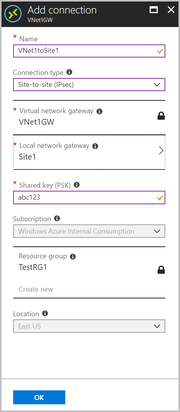
Create the Site-to-Site VPN connection between your virtual network gateway and your on-premises VPN device.
Open the page for your virtual network gateway. There are multiple ways to navigate. You can navigate to the gateway by going to Name of your VNet -> Overview -> Connected devices -> Name of your gateway
On the page for the gateway, click Connections. At the top of the Connections page, click +Add to open the Add connection page
FQDN: If you have a dynamic public IP address that could change after certain period of time, usually determined by your Internet service provider, you can use a constant DNS name with a Dynamic DNS service to point to your current public IP address of your VPN device. Your Azure VPN gateway will resolve the FQDN to determine the public IP address to connect
Configure BGP settings: Use only when configuring BGP. Otherwise, don't select this
6- Configure your VPN device
When configuring your VPN device, you need the following:
- A shared key. This is the same shared key that you specify when creating your Site-to-Site VPN connection. In our examples, we use a basic shared key. We recommend that you generate a more complex key to use.
- The Public IP address of your virtual network gateway. You can view the public IP address by using the Azure portal, PowerShell, or CLI. To find the Public IP address of your VPN gateway using the Azure portal, navigate to Virtual network gateways, then click the name of your gateway.
8- Create the VPN connection
Create the Site-to-Site VPN connection between your virtual network gateway and your on-premises VPN device.
Open the page for your virtual network gateway. There are multiple ways to navigate. You can navigate to the gateway by going to Name of your VNet -> Overview -> Connected devices -> Name of your gateway
On the page for the gateway, click Connections. At the top of the Connections page, click +Add to open the Add connection page


