|
For a long time I was thinking about hybrid cloud deploymentand, and how it becomes a very common option either azure to azure or On-premises, AWS, Google cloud, so I decided to share with you all the way to connect between with pro and Con of each one.  Azure to On-premises VPN connection A VPN gateway is a type of virtual network gateway that sends encrypted traffic between an Azure virtual network and an on-premises location. The encrypted traffic goes over the public Internet. This architecture is suitable for hybrid applications where the traffic between on-premises hardware and the cloud is likely to be light, or you are willing to trade slightly extended latency for the flexibility and processing power of the cloud. Benefits
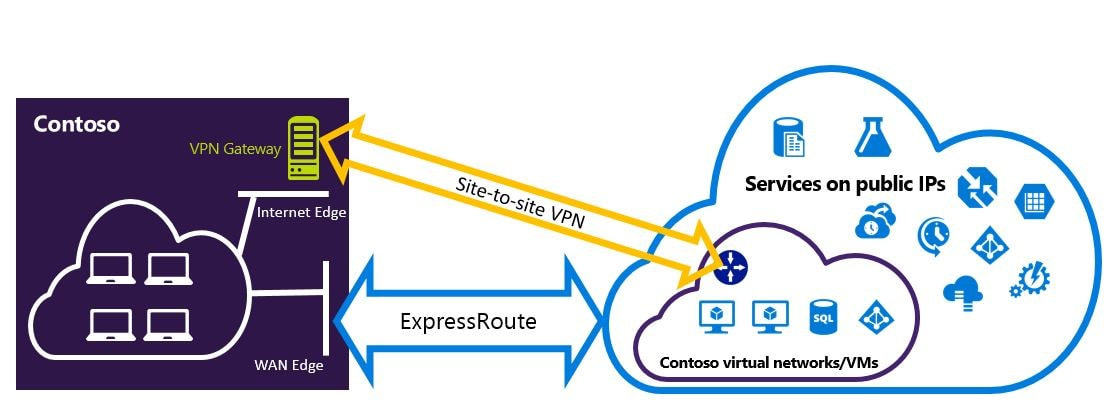
 Site-to-Site Azure S2S VPN connections provide secure, cross-premises connectivity between customer premises and Azure. This tutorial walks through IPsec S2S VPN connection life cycles such as creating and managing a S2S VPN connection. 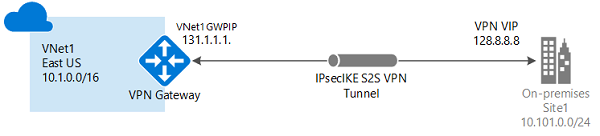 Azure Supported Services is Cloud Services and Virtual Machines Typical Bandwidths is Typically < 1 Gbps aggregate Protocols Supported work as IPSEC Routing We support Policy Based (static routing) and Route Based (dynamic routing VPN) Connection resiliency active-passive or active-active Typical use case Dev/test/lab scenarios and small-scale production workloads for cloud services and virtual machines Point-to-Site VPN connection you can also use P2S instead of a Site-to-Site VPN when you have only a few clients that need to connect to a VNet. Point-to-Site connections do not require a VPN device or a public-facing IP address. P2S creates the VPN connection over either SSTP (Secure Socket Tunneling Protocol), or IKEv2. For more information about Point-to-Site VPN Azure Supported Services: Cloud Services and Virtual Machines Typical Bandwidths is Based on the gateway SKU Protocols Supported Secure Sockets Tunneling Protocol (SSTP), OpenVPN and IPsec Routing : Route Based (dynamic) Connection resiliency: active passive Typical use case Prototyping, dev / test / lab scenarios for cloud services and virtual machines 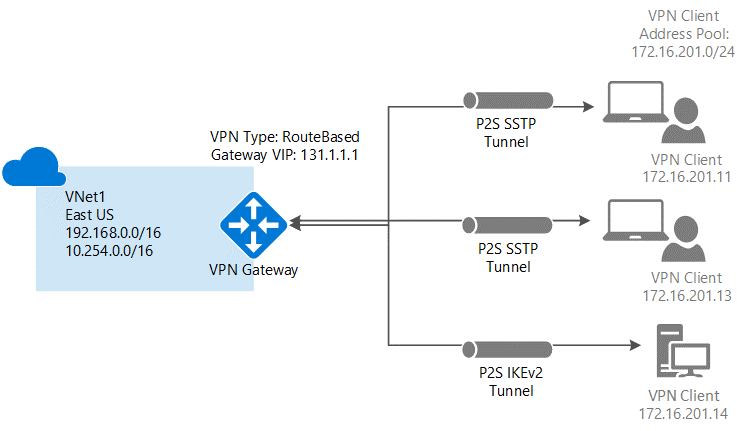 Azure ExpressRoute connection ExpressRoute connections use a private, dedicated connection through a third-party connectivity provider. The private connection extends your on-premises network into Azure. This architecture is suitable for hybrid applications running large-scale, mission-critical workloads that require a high degree of scalability. Benefits
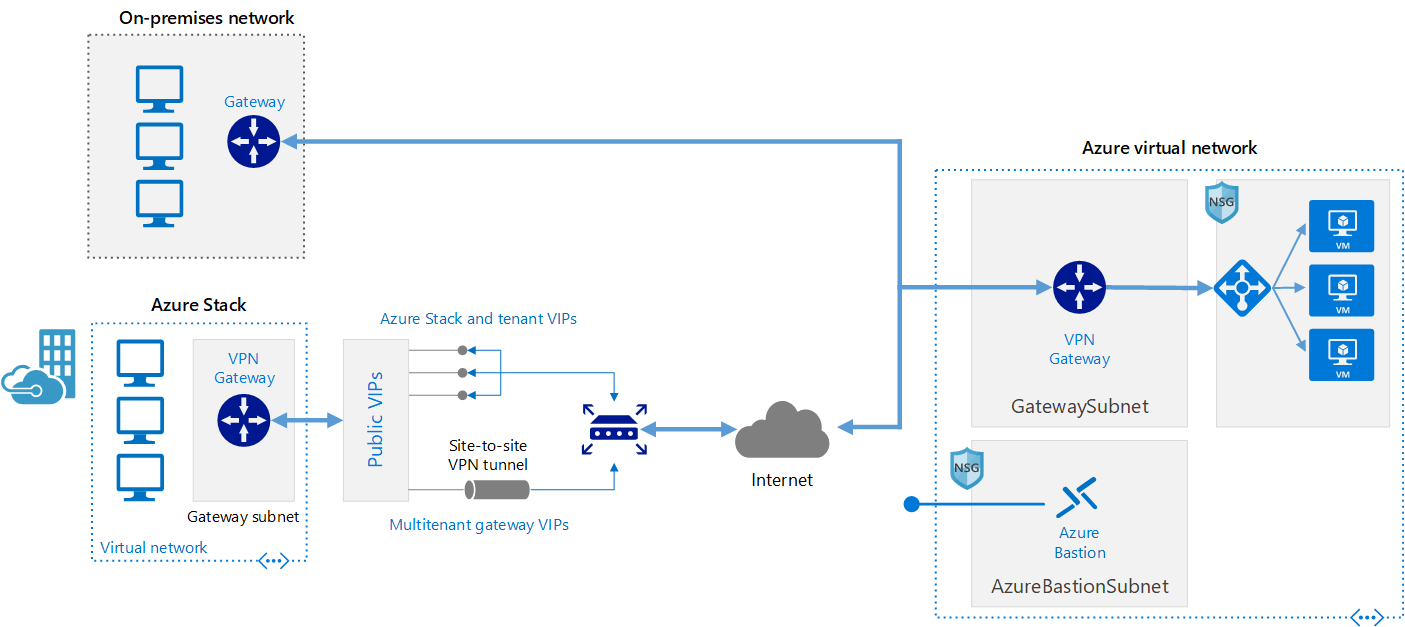
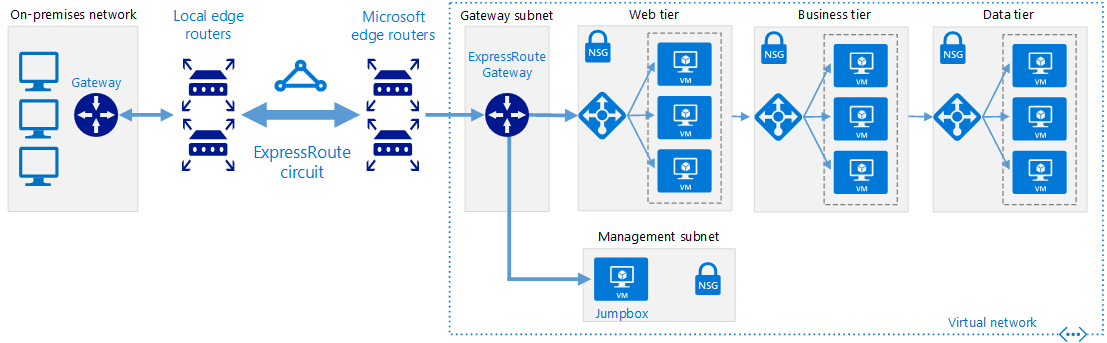 Architecture The architecture consists of the following components.
This options combines the previous two, using ExpressRoute in normal conditions, but failing over to a VPN connection if there is a loss of connectivity in the ExpressRoute circuit. This architecture is suitable for hybrid applications that need the higher bandwidth of ExpressRoute, and also require highly available network connectivity. Benefits
 Azure App Service Hybrid Connections Hybrid Connections is both a service in Azure and a feature in Azure App Service. As a service, it has uses and capabilities beyond those that are used in App Service. To learn more about Hybrid Connections and their usage outside App Service, Within App Service, Hybrid Connections can be used to access application resources in any network that can make outbound calls to Azure over port 443. Hybrid Connections provides access from your app to a TCP endpoint and does not enable a new way to access your app. As used in App Service, each Hybrid Connection correlates to a single TCP host and port combination. This enables your apps to access resources on any OS, provided it is a TCP endpoint. The Hybrid Connections feature does not know or care what the application protocol is, or what you are accessing. It simply provides network access. How it works Hybrid Connections requires a relay agent to be deployed where it can reach both the desired endpoint as well as to Azure. The relay agent, Hybrid Connection Manager (HCM), calls out to Azure Relay over port 443. From the web app site, the App Service infrastructure also connects to Azure Relay on your application's behalf. Through the joined connections, your app is able to access the desired endpoint. The connection uses TLS 1.2 for security and shared access signature (SAS) keys for authentication and authorization  When your app makes a DNS request that matches a configured Hybrid Connection endpoint, the outbound TCP traffic will be redirected through the Hybrid Connection. Note: This means that you should try to always use a DNS name for your Hybrid Connection. Some client software does not do a DNS lookup if the endpoint uses an IP address instead. App Service Hybrid Connection benefits There are several benefits to the Hybrid Connections capability, including:
Things you cannot do with Hybrid Connections include:
AWS to On-premise
Although the term VPN connection is a general term, in this documentation, a VPN connection refers to the connection between your VPC and your own on-premises network. Site-to-Site VPN supports Internet Protocol security (IPsec) VPN connections. Your Site-to-Site VPN connection is either an AWS Classic VPN or an AWS VPN. For more information You can create, access, and manage your Site-to-Site VPN resources using any of the following interfaces:
The VPC has an attached virtual private gateway, and your on-premises (remote) network includes a customer gateway device, which you must configure to enable the Site-to-Site VPN connection. You set up the routing so that any traffic from the VPC bound for your network is routed to the virtual private gateway 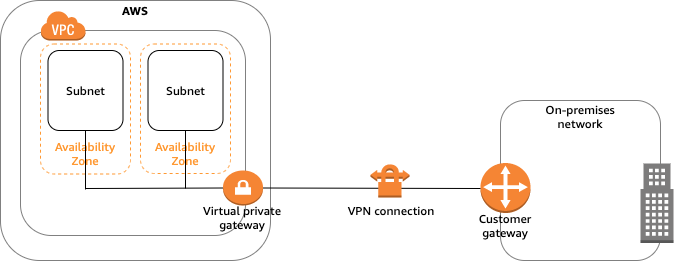 Single Site-to-Site VPN connection with a transit gateway The VPC has an attached transit gateway, and your on-premises (remote) network includes a customer gateway device, which you must configure to enable the Site-to-Site VPN connection. You set up the routing so that any traffic from the VPC bound for your network is routed to the transit gateway. 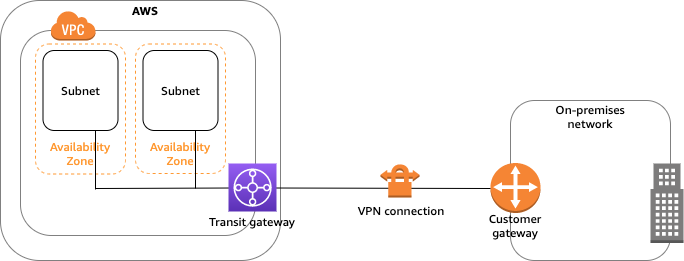 Multiple Site-to-Site VPN connections The VPC has an attached virtual private gateway, and you have multiple Site-to-Site VPN connections to multiple on-premises locations. You set up the routing so that any traffic from the VPC bound for your networks is routed to the virtual private gateway. You can also use this scenario to create Site-to-Site VPN connections to multiple geographic locations and provide secure communication between sites. 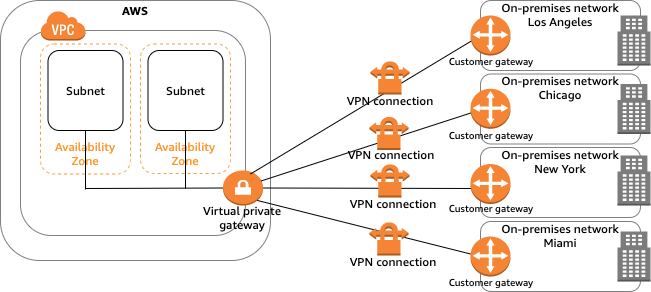 When you create multiple Site-to-Site VPN connections to a single VPC, you can configure a second customer gateway to create a redundant connection to the same external location.Multiple Site-to-Site VPN connections with a transit gateway The VPC has an attached transit gateway, and you have multiple Site-to-Site VPN connections to multiple on-premises locations. You set up the routing so that any traffic from the VPC bound for your networks is routed to the transit gateway. You can also use this scenario to create Site-to-Site VPN connections to multiple geographic locations and provide secure communication between sites. 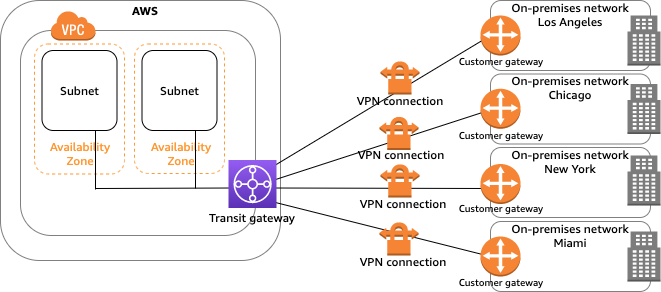 When you create multiple Site-to-Site VPN connections to a single transit gateway, you can configure a second customer gateway to create a redundant connection to the same external location.Client VPNAWS Client VPN is a managed client-based VPN service that enables you to securely access your AWS resources and resources in your on-premises network. With Client VPN, you can access your resources from any location using an OpenVPN-based VPN client. Client VPN offers the following features and functionality:
Access to a VPC The configuration for this scenario includes a single target VPC. We recommend this configuration if you need to give clients access to the resources inside a single VPC only  Before you begin, do the following:
The configuration for this scenario includes a target VPC (VPC A) that is peered with an additional VPC (VPC B). We recommend this configuration if you need to give clients access to the resources inside a target VPC and other VPCs that are peered with it (such as VPC B). 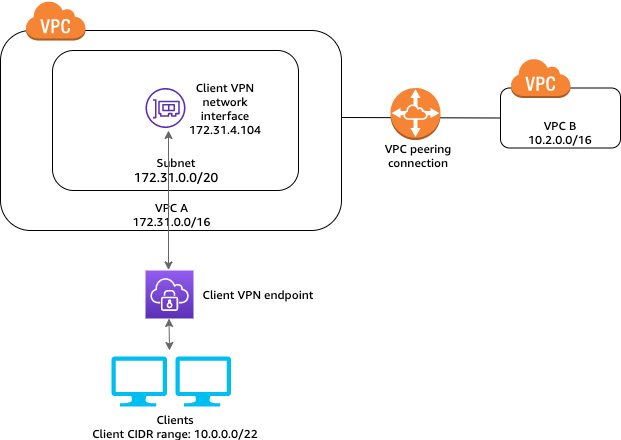 Before you begin, do the following:
Access to an on-premises network The configuration for this scenario includes access to an on-premises network only. We recommend this configuration if you need to give clients access to the resources inside an on-premises network only. 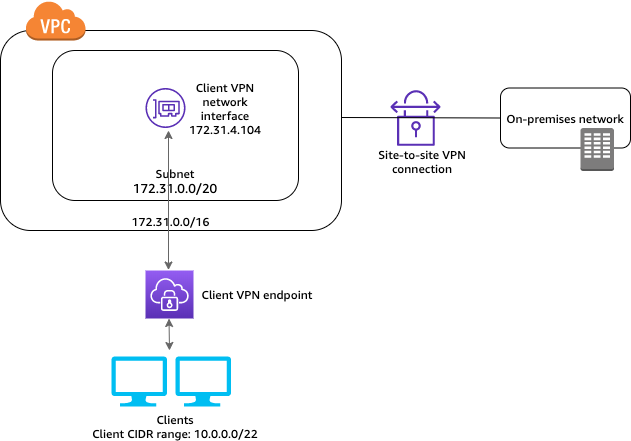 Before you begin, do the following:
Access to the internet The configuration for this scenario includes a single target VPC and access to the internet. We recommend this configuration if you need to give clients access to the resources inside a single target VPC and allow access to the internet. 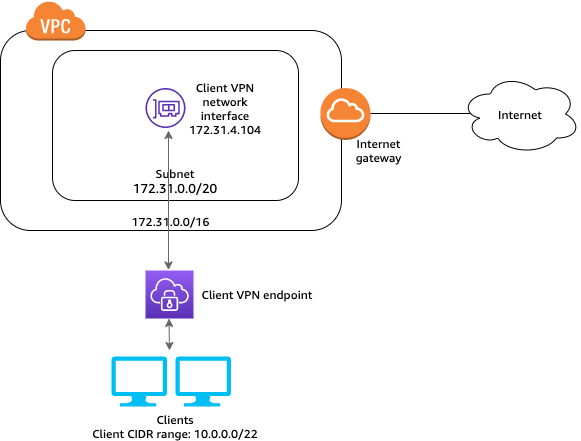 Before you begin, do the following:
The configuration for this scenario enables clients to access a single VPC, and enables clients to route traffic to each other. We recommend this configuration if the clients that connect to the same Client VPN endpoint also need to communicate with each other. Clients can communicate with each other using the unique IP address that's assigned to them from the client CIDR range when they connect to the Client VPN endpoint. 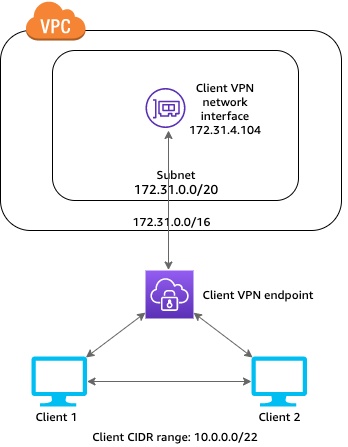 Before you begin, do the following:
You can configure your Client VPN endpoint to restrict access to specific resources in your VPC. For user-based authentication, you can also restrict access to parts of your network, based on the user group that accesses the Client VPN endpoint. Restrict access using security groups You can grant or deny access to specific resources in your VPC by adding or removing security group rules that reference the security group that was applied to the target network association (the Client VPN security group). This configuration expands on the scenario described in Access to a VPC. This configuration is applied in addition to the authorization rule configured in that scenario. To grant access to a specific resource, identify the security group that's associated with the instance on which your resource is running. Then, create a rule that allows traffic from the Client VPN security group. In the following example, sg-xyz is the Client VPN security group, security group sg-aaa is associated with instance A, and security group sg-bbb is associated with instance B. You add a rule to sg-aaa that allows access from sg-xyz, therefore, clients can access your resources in instance A. Security group sg-bbb does not have a rule that allows access from sg-xyz or the Client VPN network interface. Clients cannot access the resources in instance B. 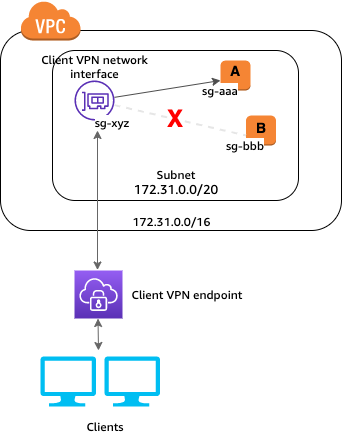 Before you begin, check if the Client VPN security group is associated with other resources in your VPC. If you add or remove rules that reference the Client VPN security group, you might grant or deny access for the other associated resources too. To prevent this, use a security group that is specifically created for use with your Client VPN endpoint. To create a security group rule
To check your security group rules
If your Client VPN endpoint is configured for user-based authentication, you can grant specific groups of users access to specific parts of your network. To do this, complete the following steps:
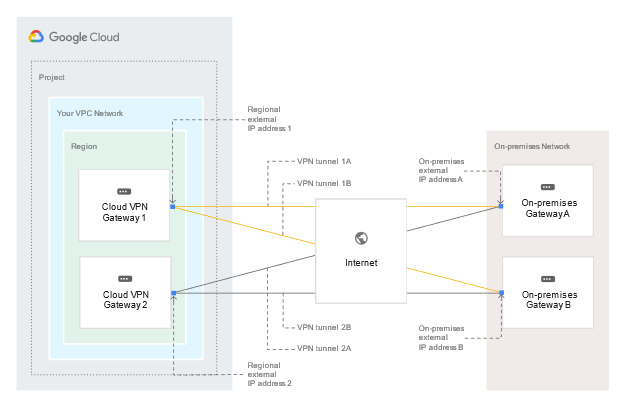
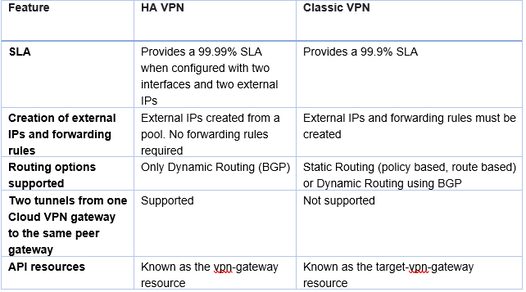
Google Cloud to On-premises Cloud VPN overviewCloud VPN securely connects your peer network to your Virtual Private Cloud (VPC) network through an IPsec VPN connection. Traffic traveling between the two networks is encrypted by one VPN gateway, and then decrypted by the other VPN gateway. This protects your data as it travels over the internet. You can also connect two instances of Cloud VPN to each other. Types of Cloud VPN Google Cloud offers two types of Cloud VPN gateways, HA VPN and Classic VPN. HA VPNHA VPN is a high availability (HA) Cloud VPN solution that lets you securely connect your on-premises network to your Virtual Private Cloud (VPC) network through an IPsec VPN connection in a single region. HA VPN provides an SLA of 99.99% service availability. When you create an HA VPN gateway, Google Cloud automatically chooses two external IP addresses, one for each of its fixed number of two interfaces. Each IP address is automatically chosen from a unique address pool to support high availability. Each of the HA VPN gateway interfaces supports multiple tunnels. You can also create multiple HA VPN gateways. When you delete the HA VPN gateway, Google Cloud releases the IP addresses for reuse. You can configure an HA VPN gateway with only one active interface and one public IP address; however, this configuration does not provide a 99.99% service availability SLA. In the API documentation and in gcloud commands, HA VPN gateways are referred to as VPN gateways rather than target VPN gateways. You don't need to create any forwarding rules for HA VPN gateways. HA VPN uses an external VPN gateway resource in Google Cloud to provide information to Google Cloud about your peer VPN gateway or gateways. HA VPN requirementsYour Cloud VPN configuration must meet the following requirements to achieve a service-level availability of 99.99% for HA VPN: When you connect an HA VPN gateway to your peer gateway, 99.99% availability is guaranteed only on the Google Cloud side of the connection. End-to-end availability is subject to proper configuration of the peer VPN gateway. If both sides are Google Cloud gateways and are properly configured, end-to-end 99.99% availability is guaranteed. To achieve high availability when both VPN gateways are located in VPC networks, you must use two HA VPN gateways, and both of them must be located in the same region. Even though both gateways must be located in the same region, the routes to their subnets that they share with each other can be located in any region if your VPC network uses global dynamic routing mode. If your VPC network uses regional dynamic routing mode, only routes to subnets in the same region are shared with the peer network, and learned routes are applied only to subnets in the same region as the VPN tunnel.
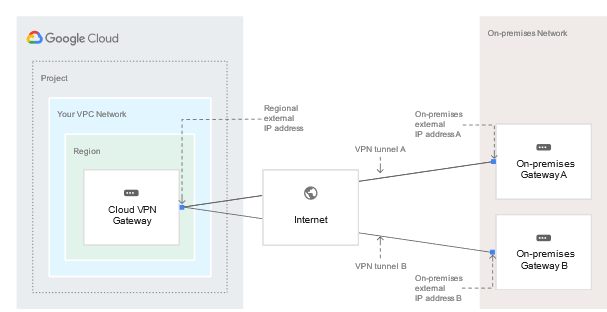
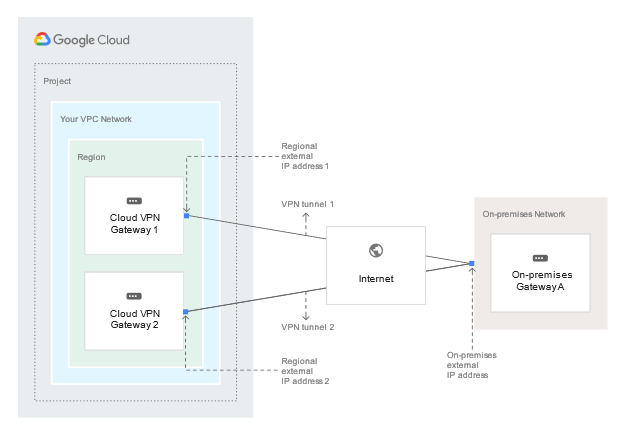
If you have two peer VPN gateway devices, each of the tunnels from each interface on the Cloud VPN gateway must be connected to its own peer gateway. If you have a single peer VPN gateway device with two interfaces, each of the tunnels from each interface on the Cloud VPN gateway must be connected to its own interface on the peer gateway. If you have a single peer VPN gateway device with a single interface, both of the tunnels from each interface on the Cloud VPN gateway must be connected to the same interface on the peer gateway. A peer VPN device must be configured with adequate redundancy. The details of an adequately redundant configuration are specified by the device vendor, and may or may not include multiple hardware instances. For details, see the vendor documentation for the peer VPN device. If two peer devices are required, each peer device must be connected to a different HA VPN gateway interface. If the peer side is another cloud provider like AWS, VPN connections must be configured with adequate redundancy on the AWS side as well. Your peer VPN gateway device must support dynamic (BGP) routing. The following diagram shows the HA VPN concept, showing a topology that includes the two interfaces of a HA VPN gateway connected to two peer VPN gateways 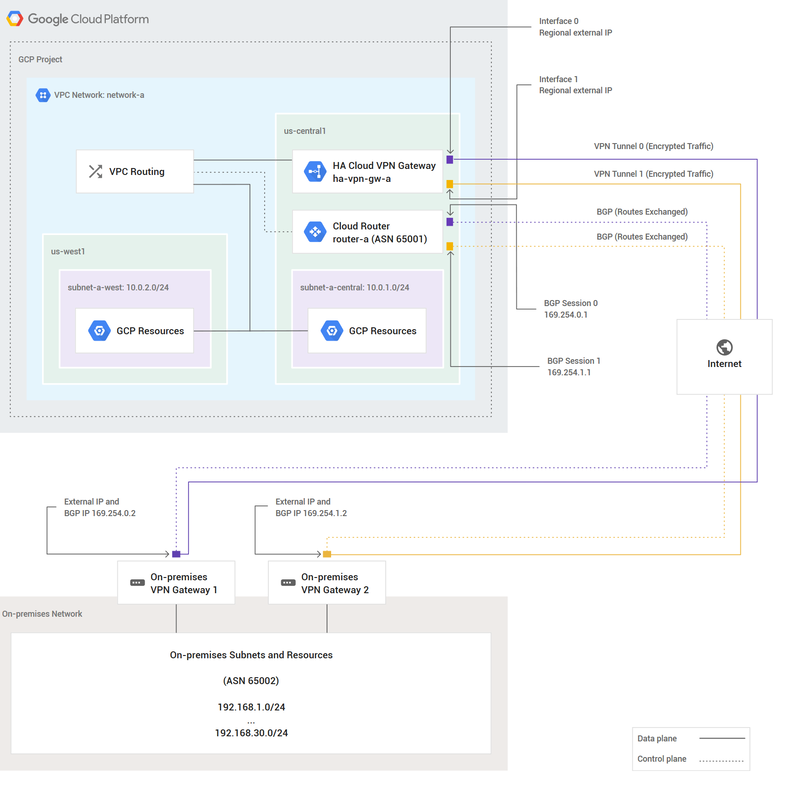 Classic VPN WARNING: Classic VPN is deprecating certain functionality on October 31, 2021. In contrast, Classic VPN gateways have a single interface, a single external IP address, and support tunnels using dynamic (BGP) or static routing (route based or policy based). They provide an SLA of 99.9% service availability. Classic VPNs are referred to as target VPN gateways in the API documentation and in cloud commands 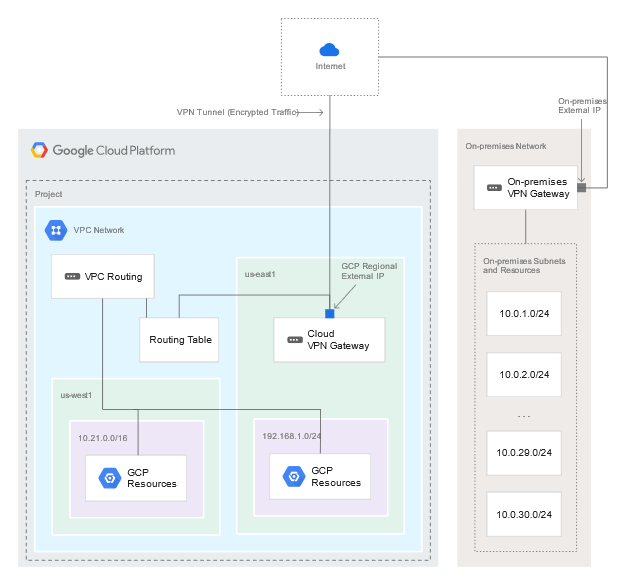 Using a second peer VPN gateway For Classic VPN, if your on-premises side is hardware based, having a second peer VPN gateway provides redundancy and failover on that side of the connection. A second physical gateway allows you to take one of the gateways offline for software upgrades or other scheduled maintenance. It also protects you in case of an outright failure in one of the devices. To configure a tunnel from your Cloud VPN gateway to a second on-premises-side VPN gateway, do the following: Configure a second on-premises VPN gateway and a tunnel. Set up a second tunnel on your Cloud VPN gateway pointing to the second on-premises gateway Forward the same routes for the second tunnel as you did for the first. If you want both tunnels to balance traffic, set their route priorities to be the same. If you want one tunnel to be primary, set a lower priority on the second tunnel. If either VPN tunnel fails due to network issues along the path, or a problem with an on-premises gateway, the Cloud VPN gateway will continue sending traffic over the healthy tunnel and will automatically resume using both tunnels once the failed tunnel recovers. 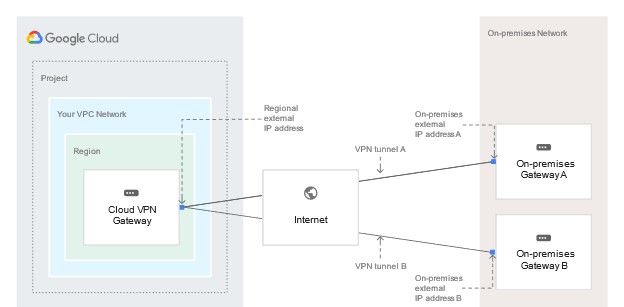 Increased throughput and load balancing options There are three options for scaling a Cloud VPN configuration:
0 Comments
Leave a Reply. |
Author
Mohammad Al Rousan is a Microsoft MVP (Azure), Microsoft Certified Solution Expert (MCSE) in Cloud Platform & Azure DevOps & Infrastructure, An active community blogger and speaker.
Al Rousan has over 8 years of professional experience in IT Infrastructure and very passionate about Microsoft technologies and products. 
Top 10 Microsoft Azure Blogs
Archives
September 2023
Categories
All
|
 RSS Feed
